Jekyll2022-12-15T10:22:57-05:00https://sumitbirla.me/feed.xmlSumit BirlaRandom blog posts and musings.Sumit Birlainquiries@sumitbirla.me?subject=Email from sumitbirla.meблог на русском языке2022-12-09T00:00:00-05:002022-12-09T00:00:00-05:00https://sumitbirla.me/2022/12/learning-russian-languageВсем привет и добро пожаловать в мой блог на русском языке. Я пишу это для практики. Я начал изучать русский язык год назад. Люди часто спрашивают меня - почему я учу этот язык, а не французский или немецкий. Есть несколько причин.
Я люблю путешествовать. Я хочу поехать в страны когда-нибудь, где люди говорят по-русски -
Россия, Украина, Беларусь, Узбекистан, Грузия, Азербайджан и другие.
В мире более 200 миллионов человек говорят на русском языке.
Изучение нового языка — это вызов для меня
Я думаю, что русский язык труден для изучения. Как бы я хотел, что начать когда был маленьким. Я надеюсь, что однажды я смогу говорить с людьми на их языке.
Немного информации о себе - Меня зовут Сумит, я живу в Тампе. Я люблю путешествовать, фотографировать и технологии. Из этого блога вы можете узнать, что мне также нравится узнавать о других культурах и пробовать разные кухни.
Это все. Желаю всем счастливого нового года.
Пока-пока!
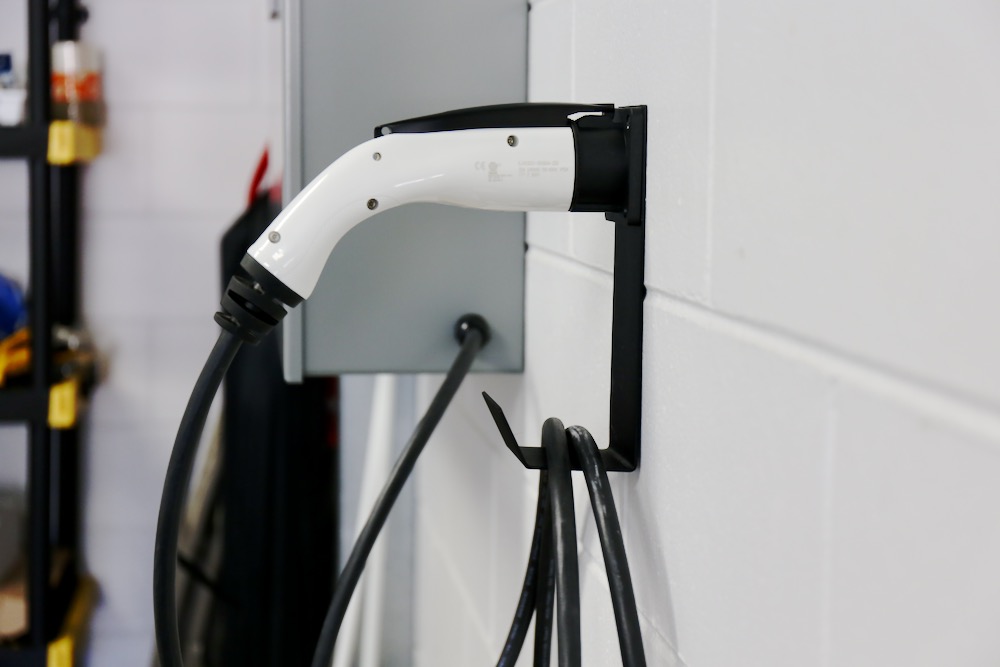
]]>Sumit BirlaDIY Level 2 EV Charger Build2022-01-25T00:00:00-05:002022-01-25T00:00:00-05:00https://sumitbirla.me/2022/01/diy-ev-charger-build
Let’s start off by correcting a popular misconception - a level 2 “EV Charger” does not actually
perform the function of charging your car’s battery pack. Instead it simply advertises that
maximum AC current it can supply and engages a contactor/relay when the car is ready. The actual
charging circuitry resides within the car. The correct term for these home chargers is Electric
Vehicle Supply Equipment (EVSE). It’s only job is to deliver power in a safe manner.
My initial plan when I purchased my Nissan LEAF was to buy an EVSE on Amazon and have an
electrician install it for me. Looking at the features of various devices, I was a bit irritated
at the “smart features” which required a WiFi connection and an app or browser to configure. I
assumed a simple home charger would be a passive device what would just work when plugged-in. No
high-tech complications required. In fact, my car came with such a device, but it only charges at
1kW which is too slow if I intend to drive every day.
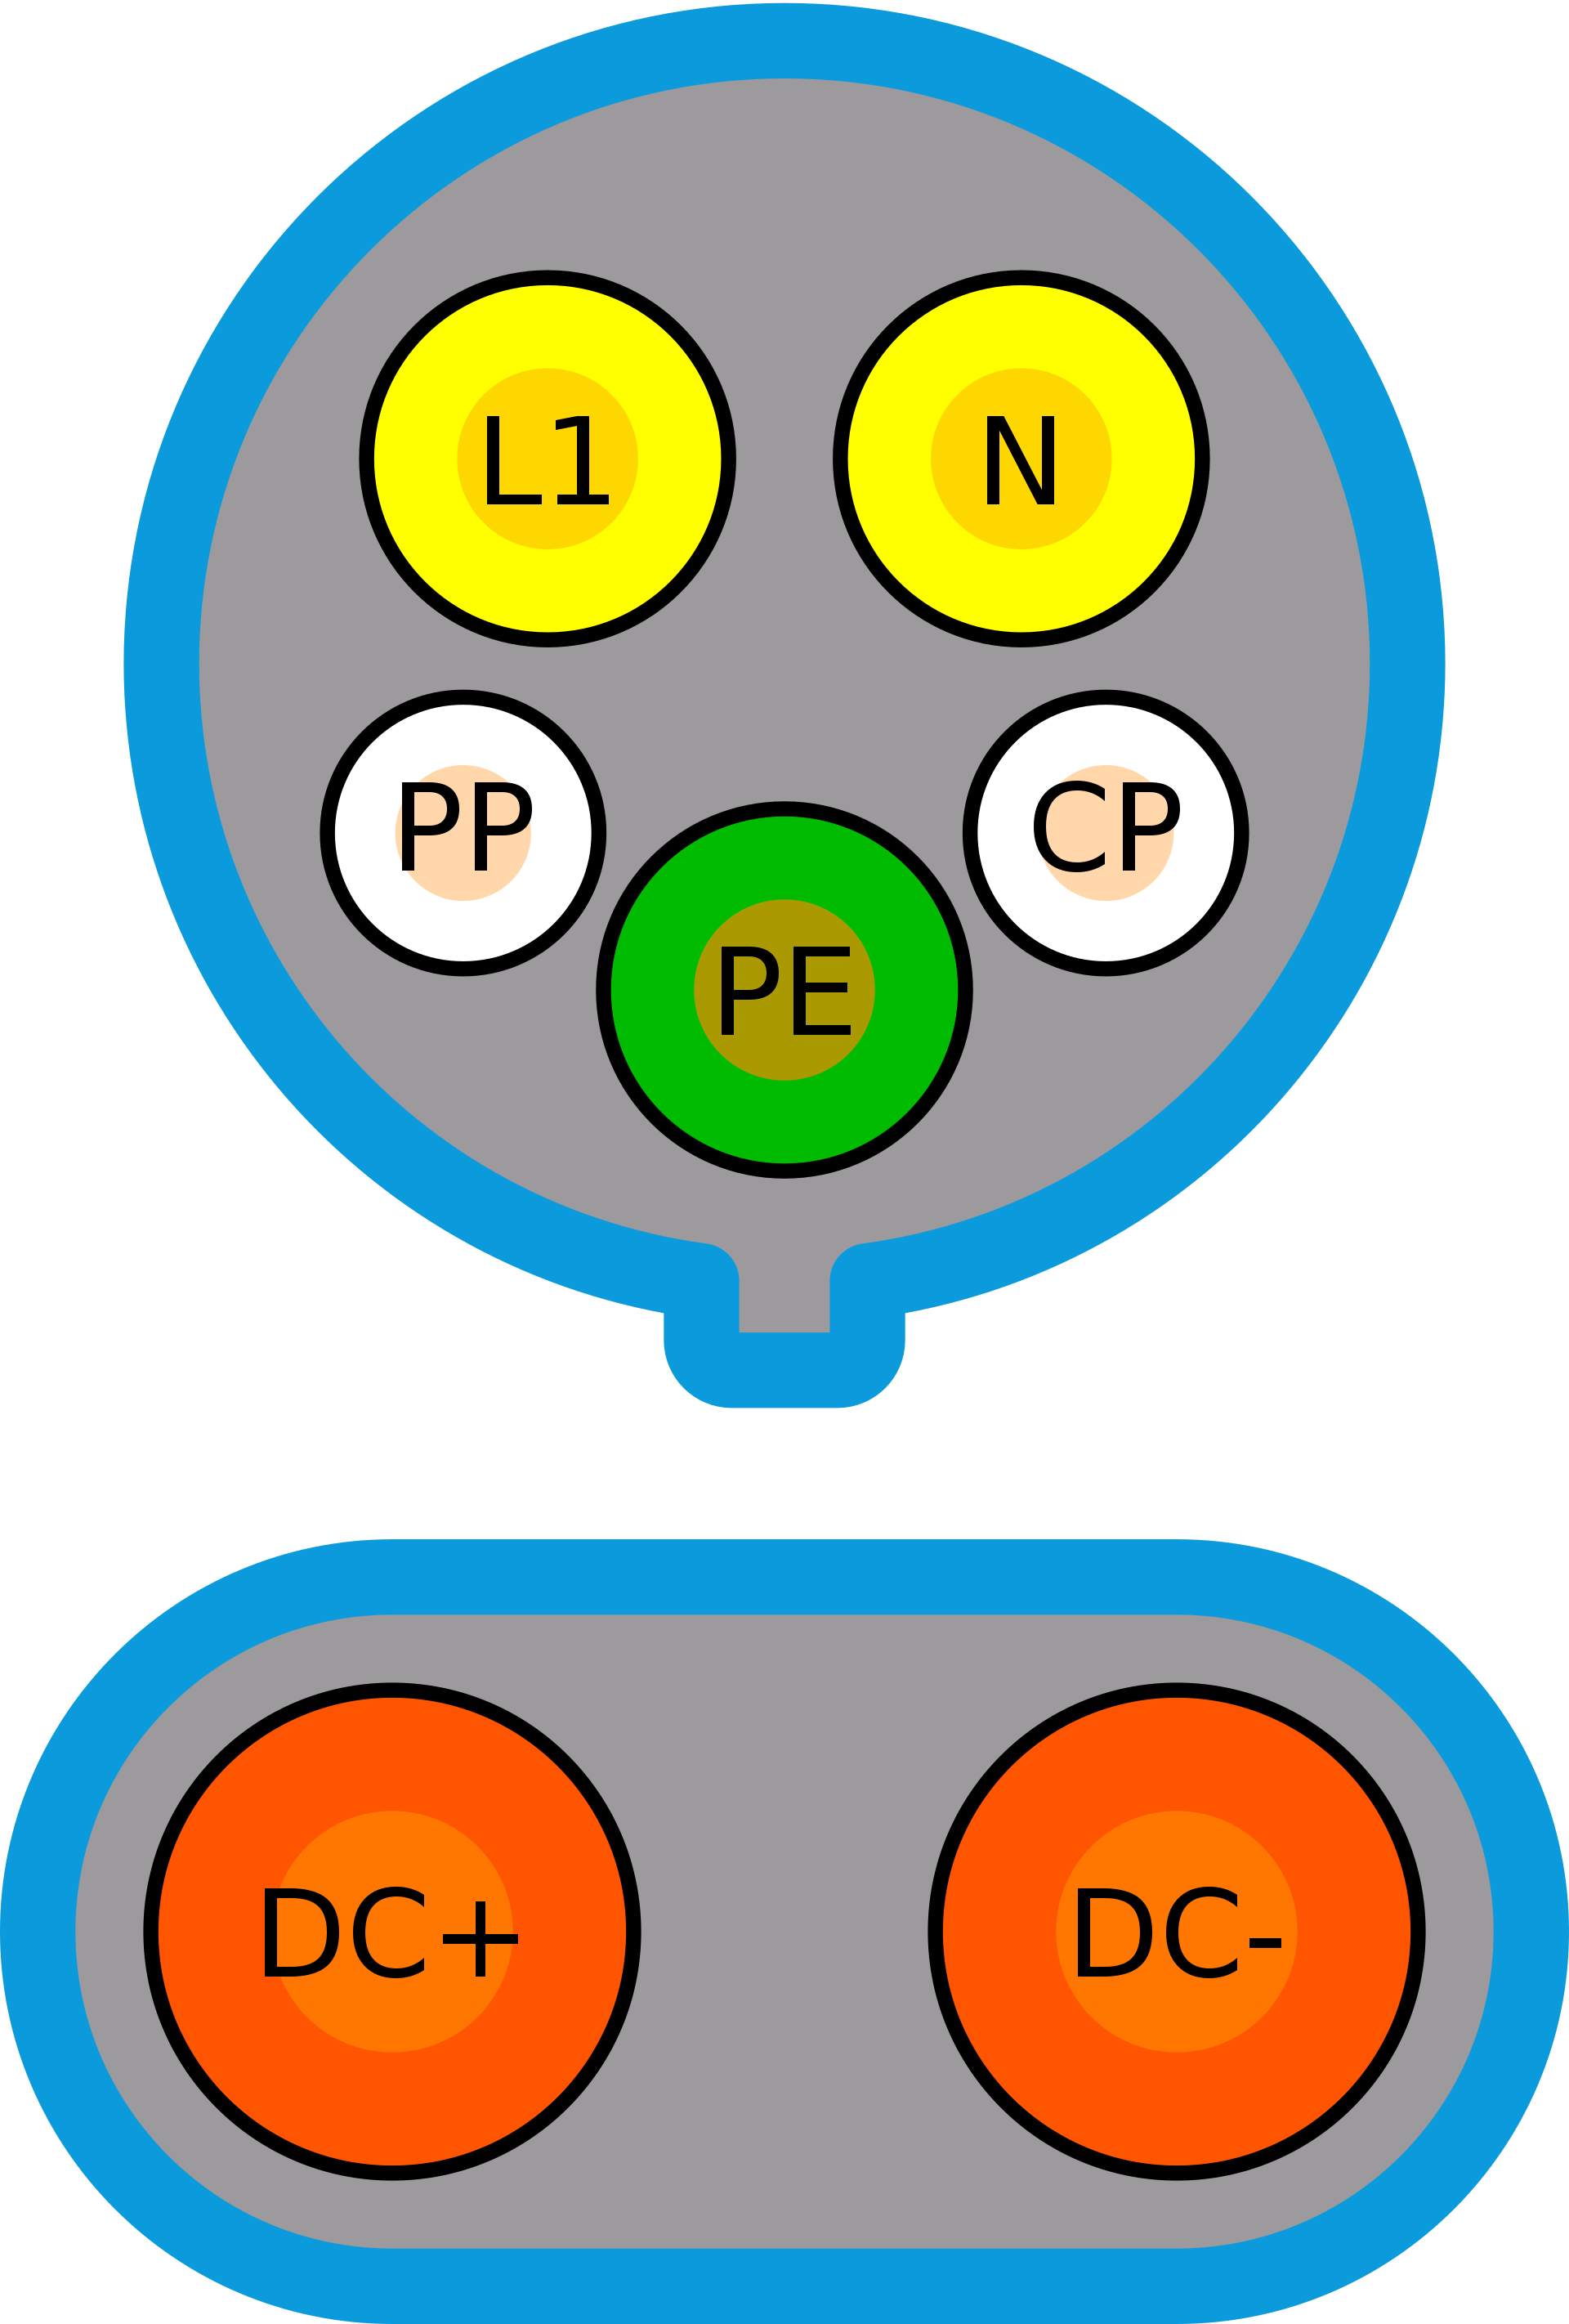
Doing some more research, I learnt how the J1772 connector actually functions. Understanding it
isn’t difficult if you are electrically-savvy. You can find the details here:
Only the top portion of the connector is used for Level 2 charging. The DC+ and DC- pins are for
fast charging at 50kW or more and are part of the CCS standard.
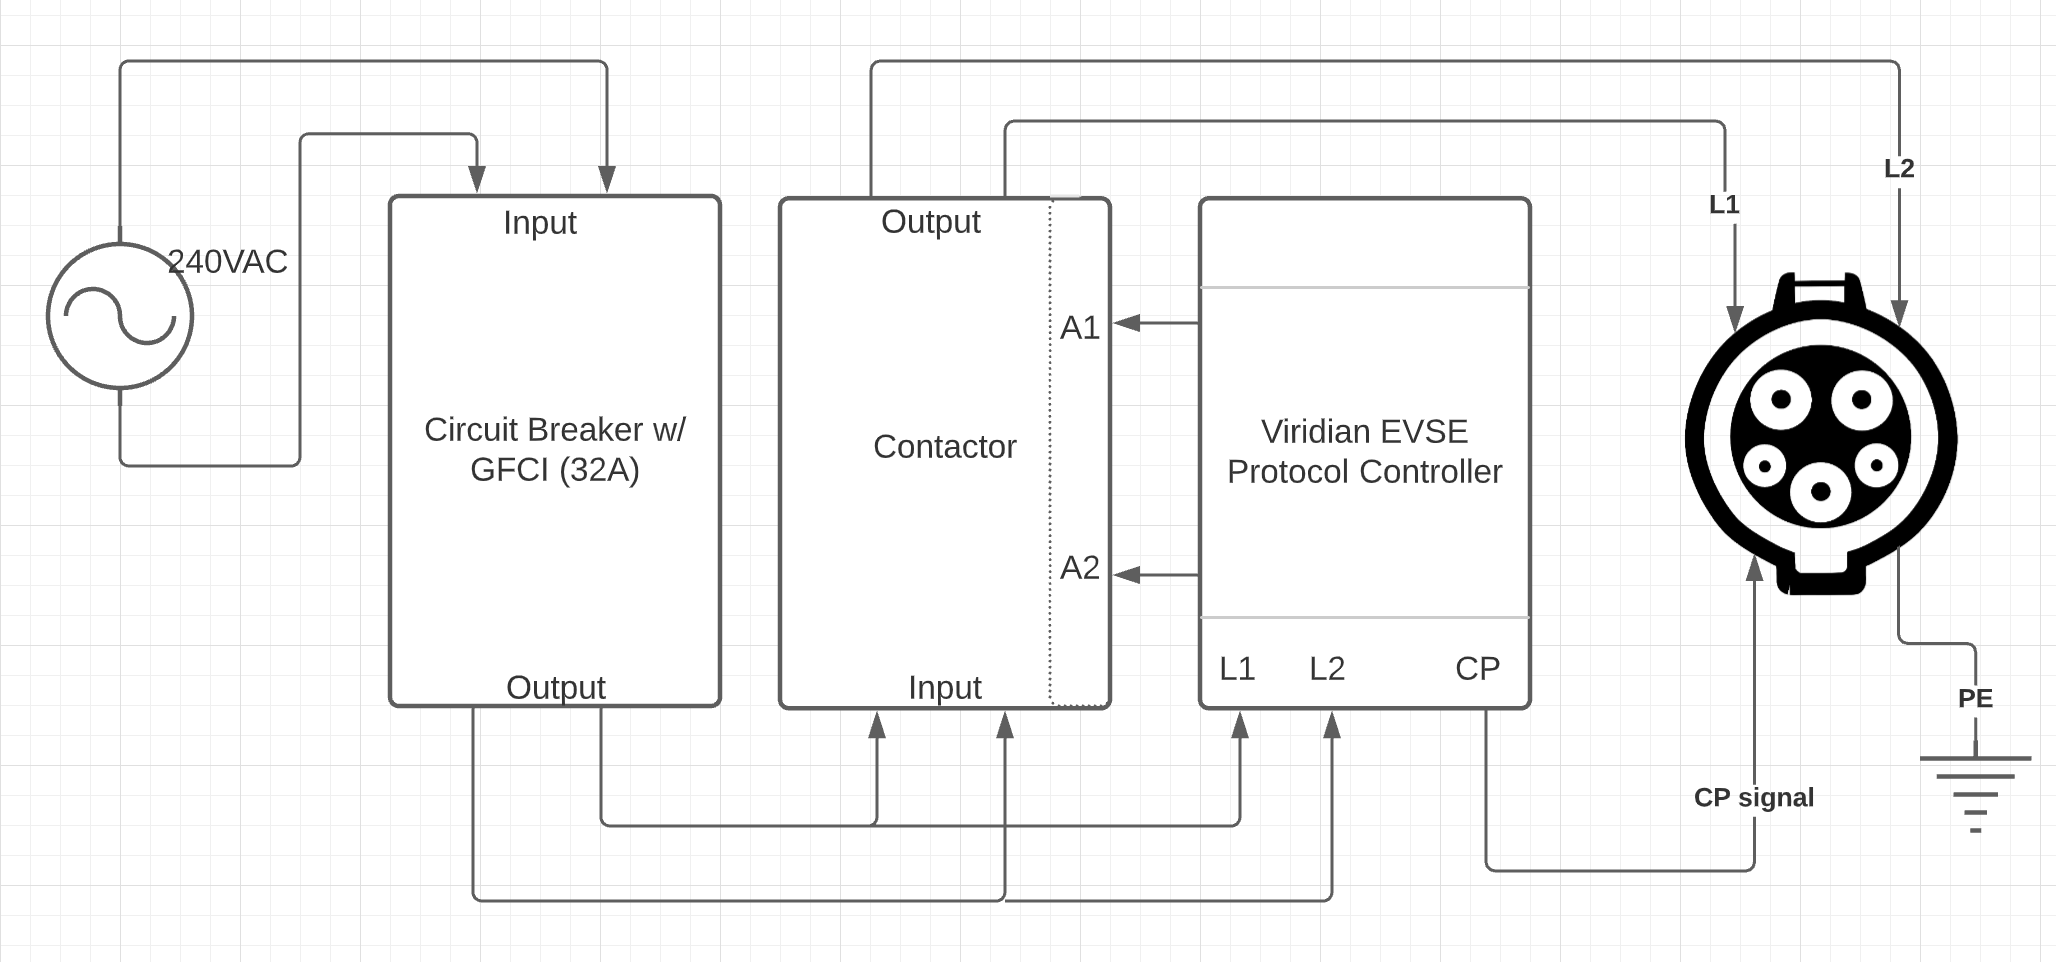
On the J1772 connector, three out of the 5 pins simply deliver 240VAC (L1, N + PE) to the car. The
additional two pins: Proximity Pilot (PP) and Control Pilot (CP) are involved in letting the car
know when the cable is connected and how much power the EVSE can deliver.
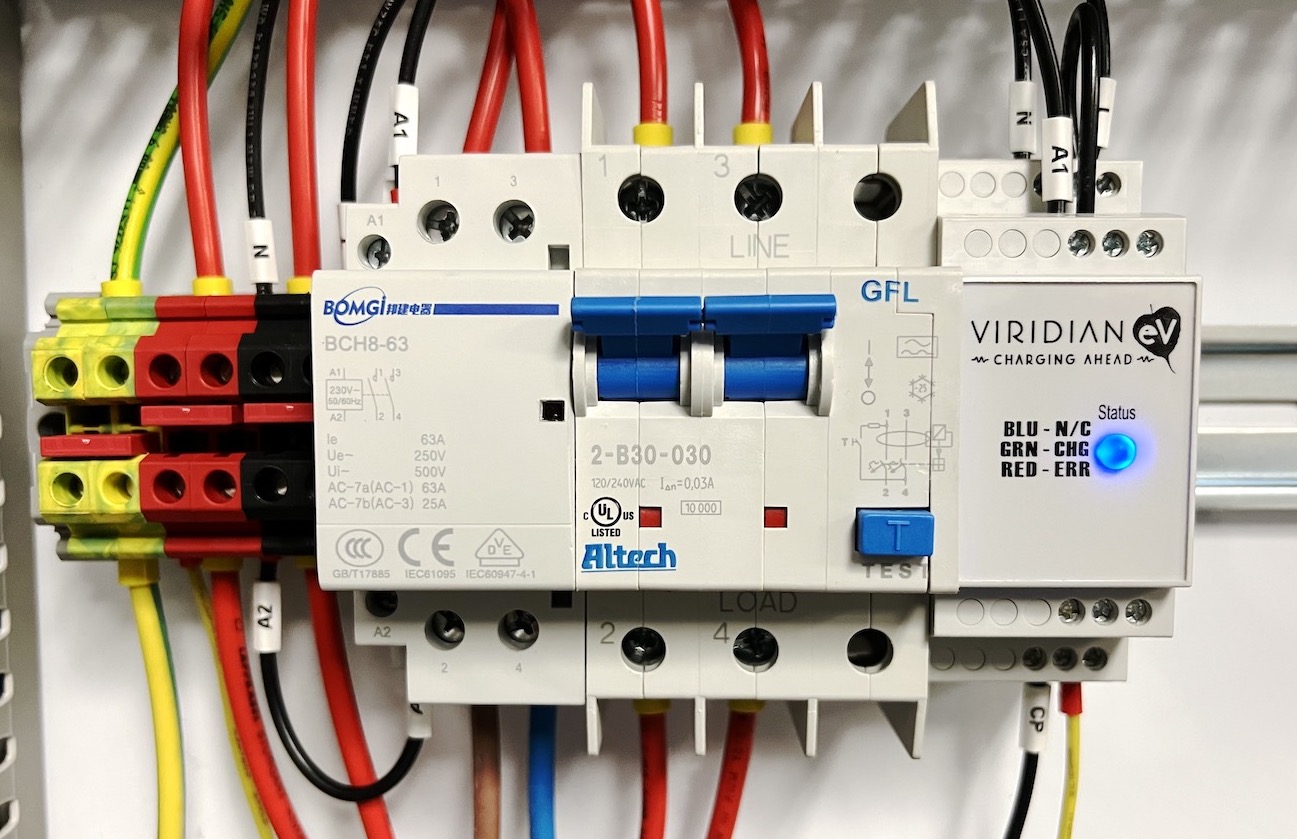
Delivering power to the L1, N and PE pins doesn’t require any sophisticated electronics. All you
need is a circuit-breaker (GFCI preferably) and a contactor. The circuit breaker prevents the car
from drawing too much current and also protects against short circuits. The PP pin functionality is
built into the J1772 handle. The last piece of the puzzle is the CP pin. This pin provides a PWM
signal to the car indicating how many amps the EVSE can deliver. For this, I used a ready-made
device from Viridian called EVSE Protocol Controller. Its job is to communicate with the car to set
a charging current limit. Once the car is ready (it informs its status by changing voltage on the CP
pin), it turns on the contactor so that current can start flowing.
As you can see from the diagram below, the system is fairly simple in theory (this schematic is for
communicating the general idea only and is missing some connections).
There are some areas that need to be paid special attention:
The system is designed to deliver a maximum of 32 amps. So the use of adequate gauge wire to handle
the load is essential. Otherwise, you could overheat the wires and start a fire. I ended up using
10AWG (6 mm2) wires in my control panel and 8AWG (10 mm2) wires to bring power to the panel itself.
Use a circuit breaker with GFCI protection. In most countries, you would have a 240V live wire and a
Neutral, however in the USA, you have two live wires. So make sure your breaker is designed to work
in a split-phase system which breaks contact on both wires. Make sure your contacts are solid. Use
ferrules any time you have stranded wires. Use certified products only (UL listed or CE) I happened
to have a control panel already installed in my garage. It is used in my other home automation
projects. However, you could buy an enclosure for a project such as this and mount the components on
a DIN rail.
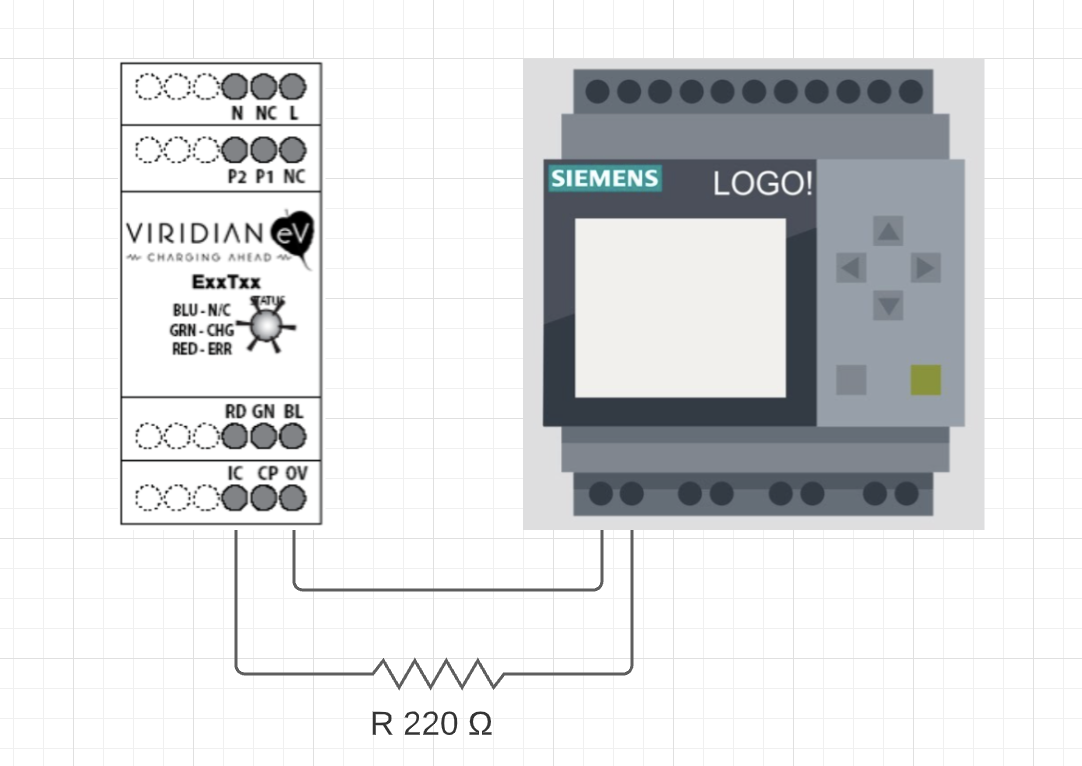
In the video above, you see that I am able to control the charge current also. I have two settings –
a slow charge (1.8kW) and normal charge at (7.7kW). This is accomplished by connecting a 220Ω
resister between the 0V and IC pins. Since I have a PLC nearby, I used a relay on it to connect and
disconnect the resistor as needed.
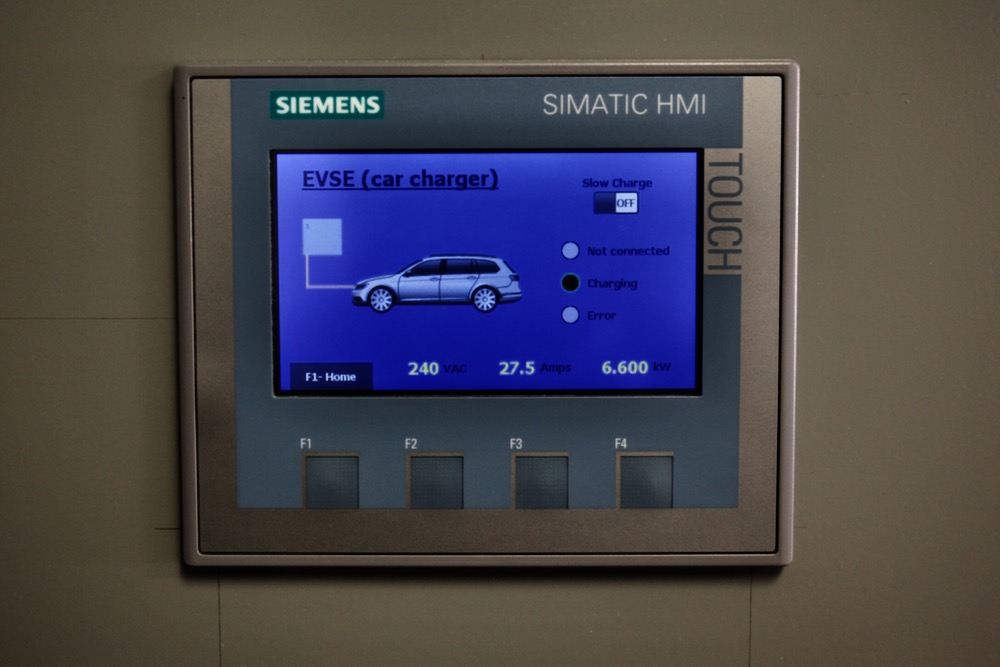
The rest of the project involved programming the existing PLC and HMI in the control panel to
display the stats on the screen. There is also a AC current transducer that is used to collect the
energy delivered information.
]]>Sumit Birlainquiries@sumitbirla.me?subject=Email from sumitbirla.meHow I Tamed My Swimming Pool2020-05-15T00:00:00-04:002020-05-15T00:00:00-04:00https://sumitbirla.me/2020/05/how-i-tamed-my-swimming-poolOne of the joys of living is Florida is having a swimming pool in the backyard. All that sunshine,
warm weather is perfect for water activities. Or so I thought.
In reality, if you are not paying attention to your pool, it can go haywire fairly quickly. It
takes only couple of hot days or rainstorms to turn the pool
green. You end up spending a lot on chemicals before you get to see sparkling blue water again. By
that time you are fed up and probably don’t want to go in the pool at all.
One of the biggest frustrations for me has been the difficulty in finding authoritative information
about pool chemistry. Do a search on Google for any pool related question, the first 50 results are
all from companies trying to sell their products. Then there are forums with self-professed
experts. “I have been in the industry for 30 years so I know what I am talking about”. There
appears to be a phenomenon online which turns everyone into experts. The herd seems to keep peddling
the same “truths.”
It all began earlier this year (2020) when I noticed my pool was the color of bright emerald green.
One couldn’t see the floor of the pool at all. So what is one to do? I checked the pH and total
alkalinity. I brought them into acceptable range by adding Hydrochloric acid (HCl) and Sodium
Bicarbonate (NaHCO₃) respectively. Then I went and purchased 10 gallons of liquid chlorine and
shocked the pool repeatedly. This killed some of the algae, but the pool was still light green. I
took a sample to the local pool store and they told me that cyanuric acid (CYA) level was too high
in the pool. I did my own test and it indicated the level was too low! 🤔 Who to believe? (Bottom
line - my test was correct).
Fast forward, after months of adding chemicals, the pool was looking clearer. But when I would brush
the floor, there still appeared to be some yellow algae present. It seemed that it was immune to
chlorine. I kept shocking the pool, but the stubborn algae refused to disappear.
So began my Internet research to find possible cause. Everyone was pretty much regurgitating the
same conventional wisdom - keep adding more chlorine. Then by chance I came across “pool ionizers”
which generate copper ions (Cu²⁺) which are considered powerful disinfectants. They are effective
against all types of algae and many bacteria. In fact, NASA has used Copper and Silver ions to
disinfect drinking water in space[4]. But our herd of Internet experts kept repeating the same
mantra - 1) it is dangerous to humans, 2) it stains your pool, 3) turns your hair green, 4) you
still need chlorine to sanitize.
All of the points above are valid, except that they leave out the fact that it is perfectly safe in
small amounts. The acceptable level of copper in drinking water is 2 ppm. A pool requires only 0.3
ppm - 0.5 ppm concentration to kill most algae and bacteria in the pool. Also at this concentration,
there is no staining of pool liner. Furthermore, unlike Chlorine, Cu²⁺ level does not drop that
fast. It stays in the water longer and keeps working. Of course, you must still test regularly to
make sure the concentration is in the acceptable range. Also for maximum efficacy, pH must be
between 7.2 and 7.6 and total alkalinity around 100ppm. You would have to maintain these levels with
a Chlorine-based system also.
Now
comes the big revelation. Should I buy a pool ionizer for $500 - $600? NO! You can buy some very
pretty copper sulphate pentahydrate (CuSO4.5H2O) for around $5 for a small
quantity (4 oz). That’s all you really need. This chemical has been used since the 19th century for
disinfecting. I have used it in high school for electro-plating experiments. Thankfully no one told
me back then that I would get metal poisoning if I touched the chemical. But I turned out
Oblerpl..3,14;K 🤪. I think.
Let’s calculate how much Copper Sulphate you need. Say you have a 50,000 liter pool (yes, we are
going to stick to Metric system). We need to raise the Cu²⁺ ion concentration by 0.3 ppm if you are
starting from zero.
Copper - 63.546 g/mole CuSO4.5H2O - 249.69 g/mol
So 1 kg of the blue powder has 63.546 / 249.69 = 0.255 kg of elemental copper.
As you know 1 liter of water has a mass of 1 kg. So to achieve an increase of 0.3 ppm elemental Cu
in the 50,000 kg pool, we need to add 0.015 kg of elemental copper. To get this amount of elemental
copper from blue powder - 0.015 / 0.255 = 0.058 kg or 58 grams.
So there you have it, add less than 60 grams (2 oz.) of blue powder to achieve full disinfection of
your pool. Best way is to dissolve it in a bucket of water first and then spread it out in the pool.
After this you can let your chlorine level drop down to 0.5 ppm or so.
Measure copper
sulphateDissolve
in bucket and disperse in pool
The very next day after I added copper sulphate to the pool, the stubborn yellow algae was gone and
the pool was blue again. I have let chlorine levels drop to around 0.5 ppm. So far the pool is
holding, there are no stains, no one has turned green - so all good.
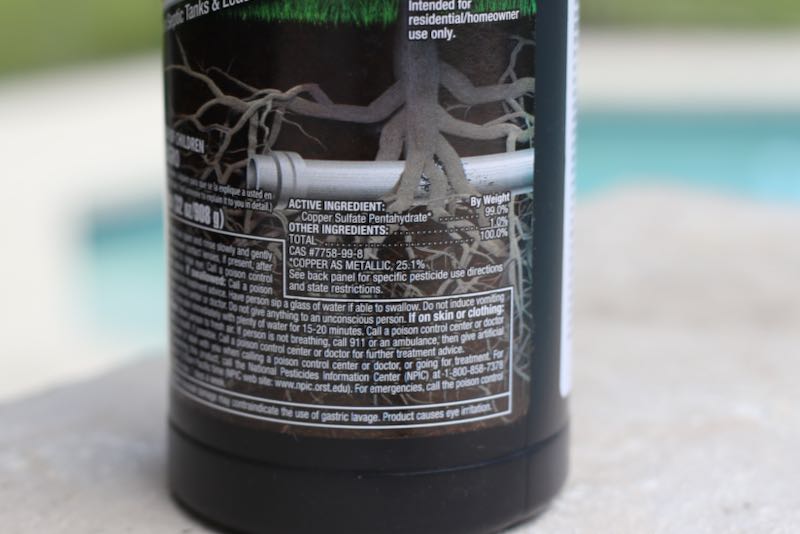
Did you know? copper sulphate is sold in many different forms. Algaecides, “Root Kill” etc. Look
at the ingredients - they all have the same stuff, but sell at different prices. Just get 99% pure
copper sulphate online - it will be super cheap and you have to use it sparingly. One thing to do is
invest in a good copper test kit [3].
Active ingredient in root
kill is Copper Sulphate
WARNING - you will be tempted to Google “How to Add Copper
Sulfate to Pools”. The very first hit tells you to add 2 lbs to 6 lbs of the chemical to your pool.
DON’T DO IT!! That is super-dangerous, overkill amount.
]]>Sumit BirlaHome Automation Philosophy2020-04-22T11:11:47-04:002020-04-22T11:11:47-04:00https://sumitbirla.me/2020/04/home-automation-philosophyIn order to build a reliable and long-lasting system, I try to follow these rules:
1. Fixed wires for fixed devices
If a home automation device doesn’t move around and is fixed in place, run wires to it from central controller. This method is more reliable than wireless setups and eliminates the need for batteries. This applies to both sensors and actuators.
2. No high level programming for low-level control
Do not use high level programming platforms running on general-purpose computers to control devices such as thermostats and irrigation systems. Implement core logic on the controller device itself so that it continues to operate normally even if network is not available.
3. Avoid cloud-connected devices
Make sure your home automation continues to operate normally even when Internet is not available or a manufacturer of a device goes out of business. If you do need to push data to the cloud, use an auxiliary gateway device.
4. Avoid proprietary technology
Implement everything using interoperable standards. For example, use MQTT or Modbus for communication rather than a proprietary API.
5. No loose wires
Use DIN-rail mounted components when possible. Use terminal blocks and avoid custom-built circuits. When possible, use industrial components which tend to be well documented, certified and of high quality.
6. Learn underlying principles
For any device you wish to control, understand how it works. For example, a thermostat is essentially 3-4 relays that turn on based on input from a temperature sensor. There is no magic happening in your “Smart Thermostat.”
7. Keep cost low
Determine what you need and then monitor Amazon, eBay and AliExpress for lowest price. It may take many days for a deal to pop-up, but they do eventually show up.
8. Document everything
One day when your memory starts failing and you need to modify behavior of a device, make sure you have enough documentation to be able to do so.
Example
Say you want to replace your old-school thermostat with something you can control remotely:
Understand how thermostats work
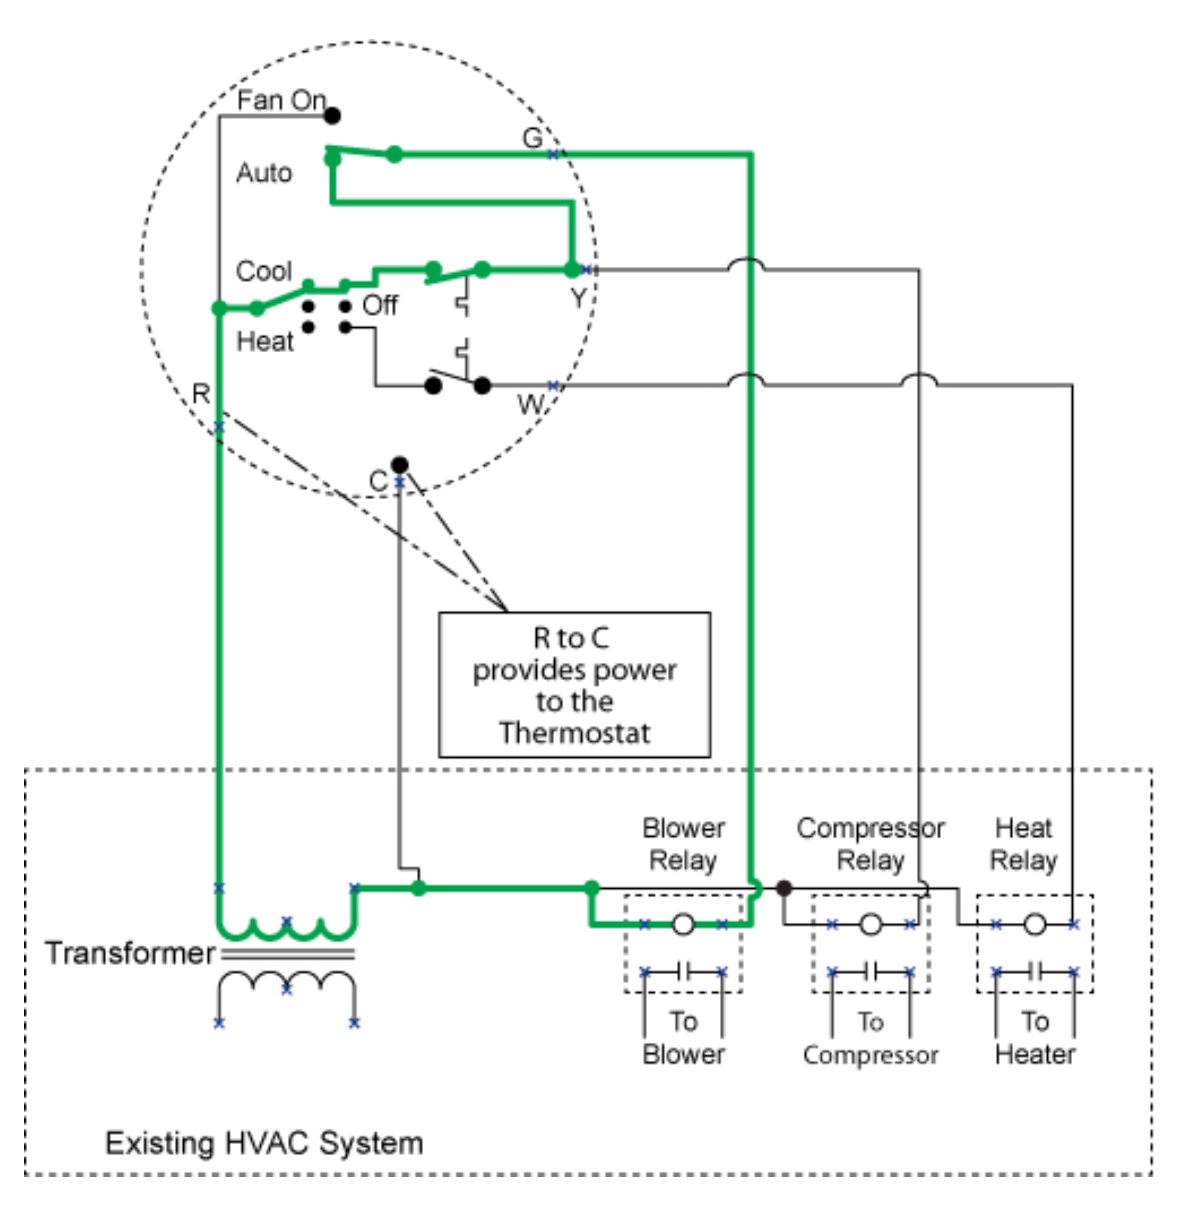
This diagram explains very clearly what role a thermostat plays in controlling your HVAC system:
The circle is your thermostat[^1]
Essentially you need 3 relays which need to be turned ON or OFF based on temperature set-point. Your HVAC systems has a 24VAC transformer. You simply need to pass this signal (available on Red wire) on to Green wire for blower, Yellow for compressor and White for heater.
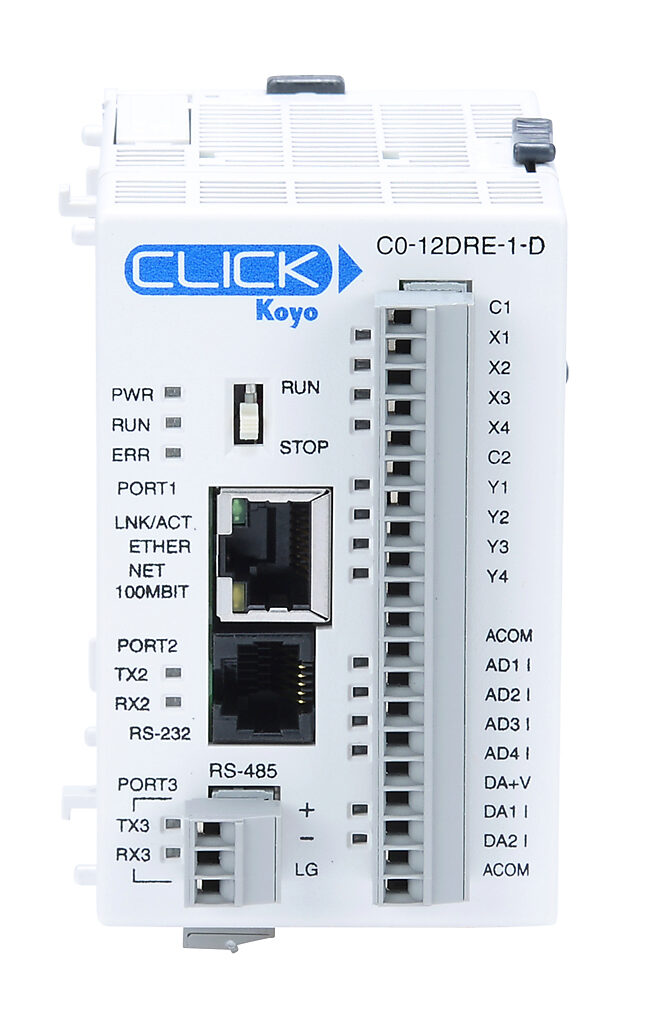
Select hardware to implement this functionality
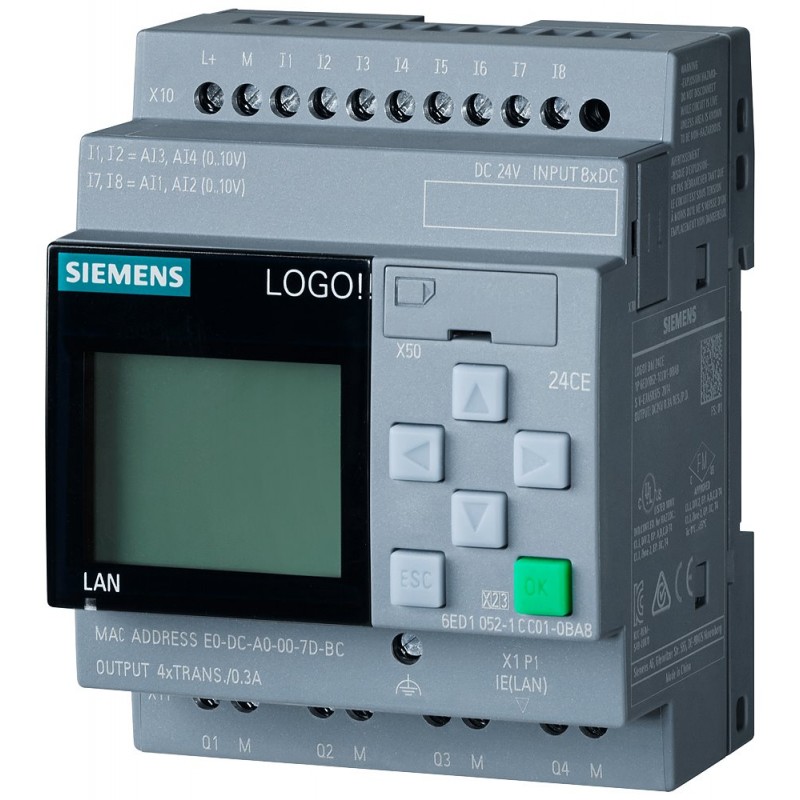
A Siemens LOGO! or a CLICK PLC1 has all the prerequisites to implement a thermostat:
You could use any PLC really from a dozen different manufacturers, but I have invested time in learning the LOGO!, so that is what I analyze for this purpose:
Function
✅ RELAYS
4 relays available with maximum current of 10A. A thermostat typically needs to handle less than 2A
✅ Analog Inputs
0-10V analog inputs can be used to connect an industrial temperature sensor
✅ Programming
LOGO! is programmed using FBD. No spaghetti code possible.
✅ Network
Onboard ethernet that speaks Siemens S7 protocol or Modbus-TCP. Very convenient to interface with node-red or HomeAssistant.
✅ COST
This PLC typically sells for around $160, however you are plenty of used ones available on eBay. I got mine at AliExpress for $67.
Sure you can implement the same functionality using a ESP8266, Arduino or a Raspberry Pi. But I have written another article2 about why I would not use these devices for such purposes.
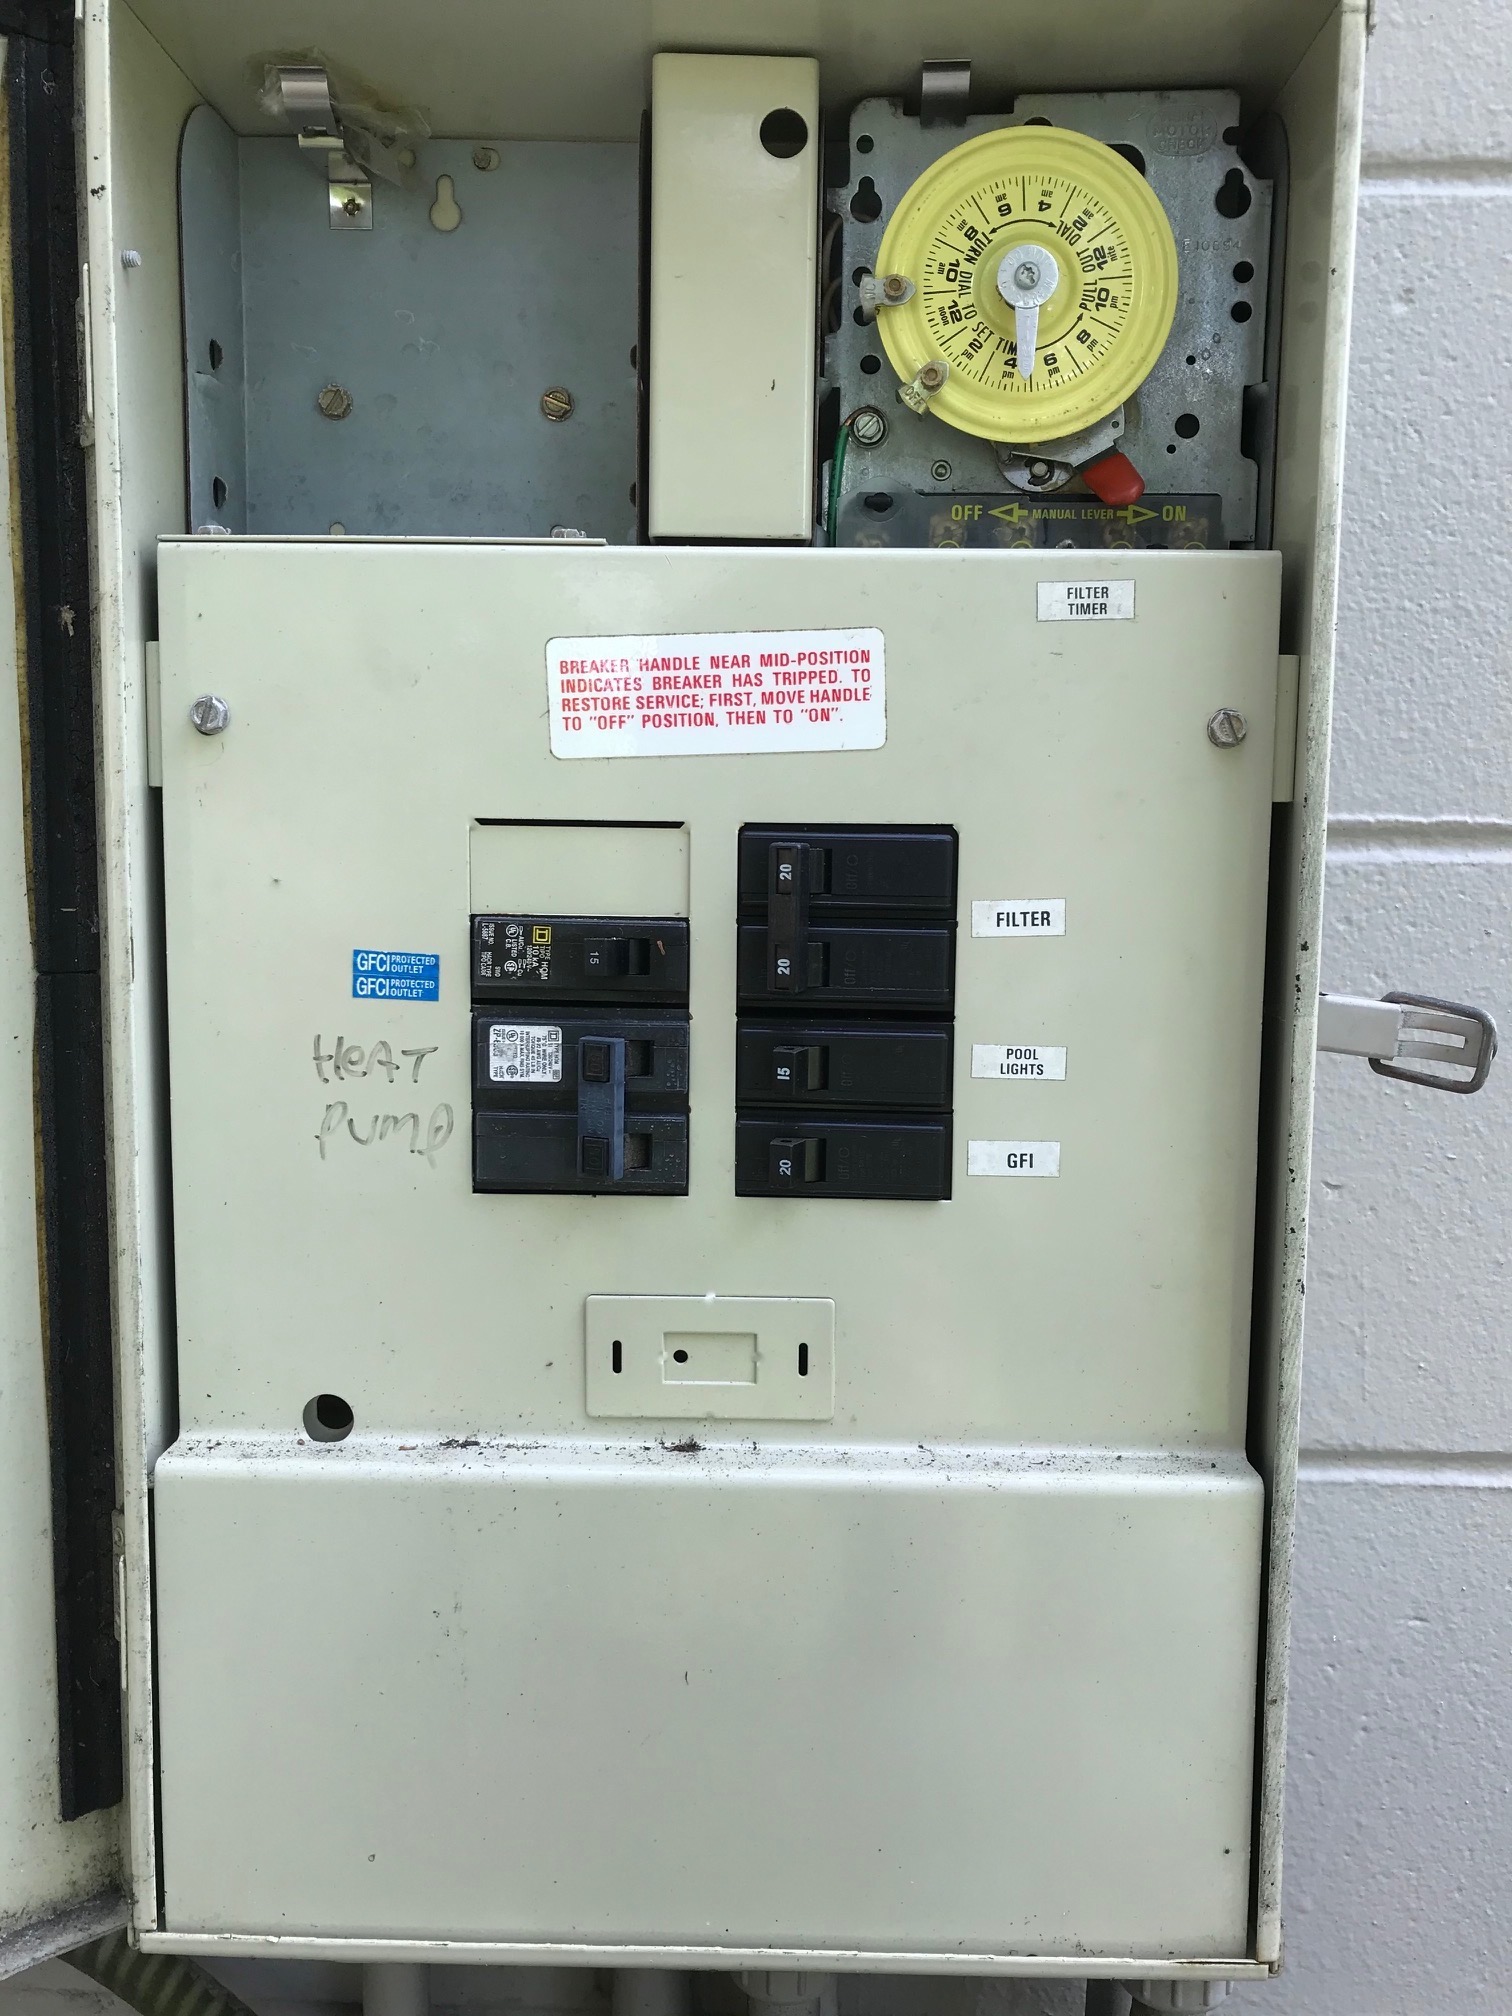
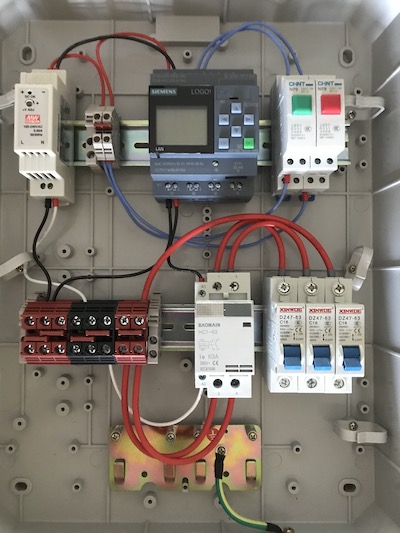
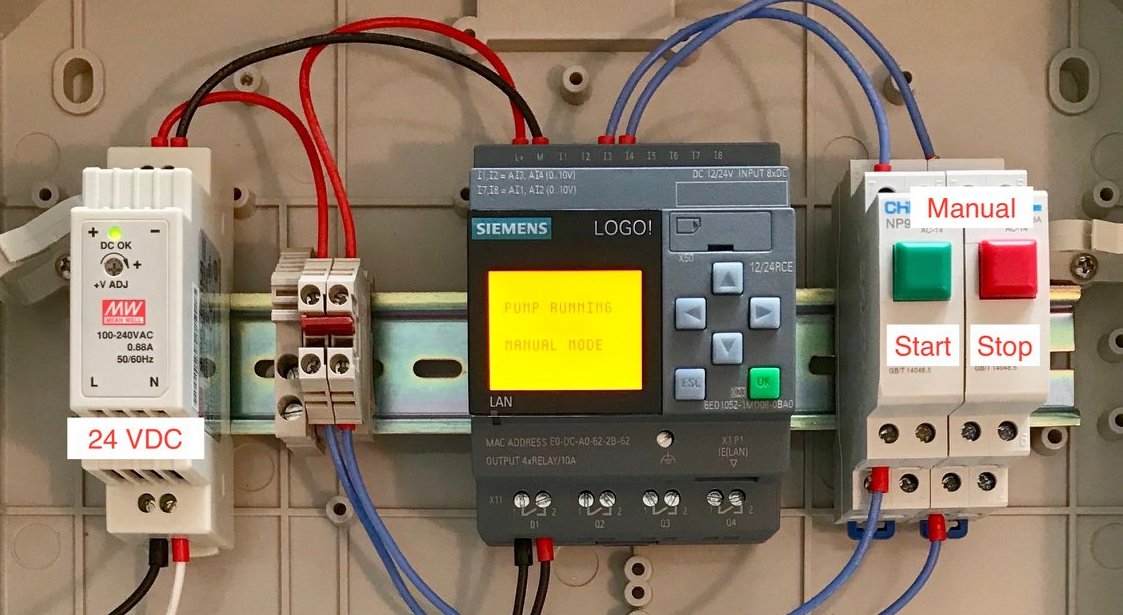
]]>Sumit BirlaMy Pool Control Panel2020-01-17T11:30:23-05:002020-01-17T11:30:23-05:00https://sumitbirla.me/2020/01/my-pool-control-panelThis blog post describes my PLC-based pool controller panel. It is a complete replacement of the existing electrical panel. I built this as a learning-experience project in Industrial Automation techniques. I have used a PLC and other DIN-rail mounted components such as contactors and circuit-breakers to achieve the same functionality as the existing panel. Furthermore because I am using a network-connected PLC, I can remotely control and monitor the status of my pool pump.
→
Existing panel with mechanical timer
New PLC based control panel
As you can see above, the new panel looks quite a bit different. But many of the components are the same. For example, the circuit-breakers for the pool pump (16A), heater (50A) and one for an electrical outlet (16A) mirror the old installation. Instead of a mechanical timer, I now use a PLC. The benefit of using a PLC (other than being just plain fun to learn to use) is that I can set a separate pump schedule for each day of the week. Because the PLC has an ethernet connection, I can add the control panel to my larger home automation network and turn pump on/off remotely. At some point in the future, I plan to add sensors to read pH and water temperature since the PLC already has inputs to handle these.
Bill of Materials
Item
Qty
Price
Source
Siemens LOGO! 12/24 RCE
1
$70
AliExpress
Altelix NEMA Enclosure 17x14x6
1
$80
Amazon
Mean Well DR-15-24 Power Supply, 24 Volt, 0.63 Amp
1
$13
Amazon
Baomain AC Contactor HC1-63 110V 63A 2 Pole
1
$17
Amazon
uxcell 1 Pole 50A 230/400V Miniature Circuit Breaker
1
$9
Amazon
uxcell 1 Pole 16A 230/400V Miniature Circuit Breaker
Although Ladder Logic is the most common way to program in the automation world, I used Function Block Diagram (FBD) just because there seems to be more support online for this method of programming for the Siemens LOGO!
Download the program (open using LOGO! Soft Comfort)
PDF Version – for viewing if you don’t have LOGO software
]]>Sumit BirlaUsing PLC for Home Automation2020-01-06T13:01:09-05:002020-01-06T13:01:09-05:00https://sumitbirla.me/2020/01/using-plc-for-home-automation
This post is not meant to teach you what a PLC is. If you are unfamiliar with it, I suggest you
make a quick read of the following before returning to this page:
What is a
PLC?
Automating routine tasks around the house has been a goal of mine for as long as I can remember. Examples of such tasks are:
Turn on outdoor lights at dusk and turn them off at dawn
Turn off HVAC when no one is at home
Turn off closet lights automatically 30 minutes after being turned on
Turn off the sprinkler system when it has rained
In addition to controlling “things” I also want to be able read data from sensors
remotely. Example of such sensors are: temperature, humidity, electricity consumption, water-flow, doors/windows status etc.
Ideally all “smart devices” have a local human interface and are also controllable over a network (WiFi, Ethernet, Zigbee, Z-Wave, RS485 etc.) Network control allows one to build higher-level dashboards with big touchscreens and also interface with voice assistants such as Alexa and Google Home. Couple of popular software options for building interfaces are Node Red and HomeAssistant.
The problem with deploying “smart devices” has always been related to reliability (remember X10), proprietary nature of the products and just plain poor implementation. There is no way I am going to install a proprietary App to control a light bulb! There are a few checkboxes that need to be ticked for a “smart home” device to be incorporated:
NON_SMART_MODE
It should work as a standard “non-smart” device also.
NETWORKED
Should be controllable over a data network, but not depend on it. I.e. all logic necessary to operate must exist on the device itself. Device should be unaffected by network failures.
RELIABILITY
Will the device still function in 10 years not requiring an upgrade or reboot?
MAINTAINABILITY
Can someone other than me troubleshoot in case a device stops working? Are industry-standard protocols and techniques used.
COST
Should not cost an exorbitant amount, after all this is probably a hobby project for you.
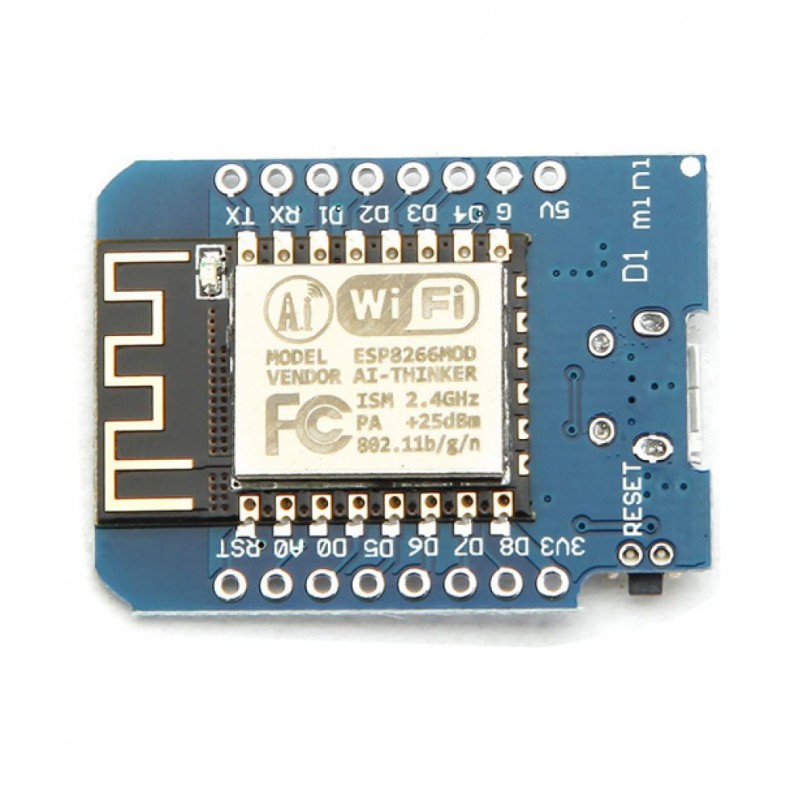
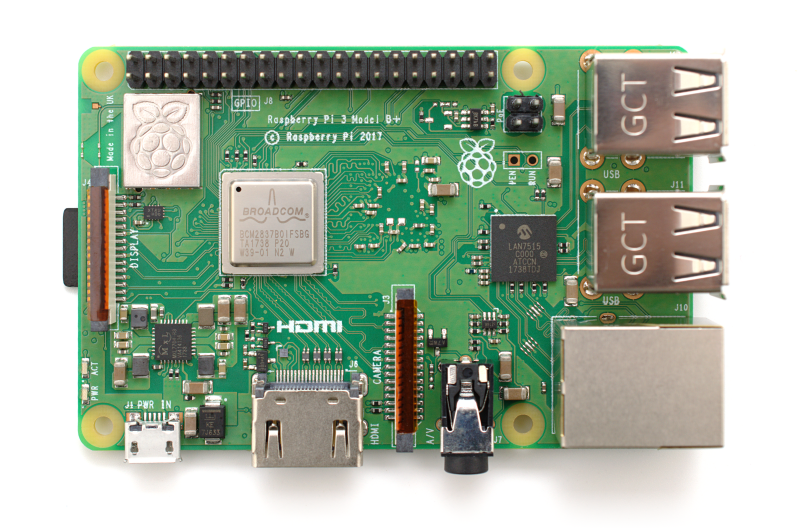
As far as hardware goes, the popular choices are Arduino, ESP8266-based boards and Raspberry Pi. In
fact such a large portion of the Home Automation enthusiast community uses one of these platforms,
that it will be difficult for you to find sample code or help if you use anything else. On
message-boards, you are unlikely to find anyone recommending the use of PLCs.
Granted that Arduino has been a huge step up in terms of rapid prototyping and has led to really fascinating projects being built by people with little electrical engineering background. A quick Google search will show you basically anything you want to build, someone has already done it and posted their schematic and code online. But my question always comes back to its longevity. Past the fun-build stage, will I enjoy maintaining it? If I am not around, will anyone be able to make heads or tails of what I have built? Does it actually simplify my everyday routine in someway, or just add another thing that needs to be maintained?
Why PLC?
Well, let’s see how the various devices fare when it comes to the above-listed criteria:
Arduino
ESP8266
Raspberry PI
PLC
NETWORKED
❌
✅
✅
✅
RELIABILITY
❌
❌
❌
✅
MAINTAINABILITY
❌
❌
❌
✅
COST
✅
✅
✅
❌
I think the table above probably has caused some disagreements in your mind. Especially ones related
to “reliability” and “maintainability”. Let me give you simple example: you have a networked esp8266 switch that turns ON/OFF your pool pump motor. You have soldered a bunch of wires to relays and one day it does not turn on. What do you do about it? Will someone other than you be able to resolve this issue? Is it a software problem or hardware?
I have been running Node-Red at home which does a whole bunch of functions. Everything from sending signals to turn ON/OFF lights to reading sensors. Some of the sensors are 433MHz sensors decoded using RTL dongle, some are Z-Wave and some are WiFi. Every now and then I am forced to update my Linux server because I need the update to be able to run some software. Guess what, WiFi AP may not come back online, certain Node-Red flows may fail until I address the underlying issue. The point is a seemingly benign operation on a computer may have unexpected effect with rest of the system. That is why you will never see a Windows or Linux directly controlling safety-critical industrial equipment.
Let’s look at an example PLC that I have chosen to use for some of my projects:
Siemens LOGO! 12/24 RCE
Logic module with display
Power supply: 12/24 VDC
8 DI (Digital Input) 4 of which can be used as AI (Analog Inputs)
4 DO (Digital Output) Relay
Real Time Clock (RTC)
Memory: 400 blocks
modularly expandable
Ethernet
Integrated web server
Notice the neatly packaged module. It has a built-in display with buttons for basic configuration. The 4 Relay output can be used to switch currents up to 2.0A each. There are 8 general purpose inputs, 2 of which can also take 0-10V analog input. 0-10V sensors are an industrial standard along with 4-20mA. Ethernet is built-in along with a web server for building Human Machine Interface (HMI). So for the price of a single PLC, you are getting quite a bit!
Why not pick a different brand of PLC like Allen-Bradley or Schneider Electric? Well, in my case the decision was made for me. Siemens LOGO! appears to be the only PLC whose programming software runs on Linux and Mac. Based on YouTube videos I have watched, I would say programming on most systems will be very similar, so I don’t feel like I have invested time in a brand-specific system.
Now, let’s look at the software. On Arduino, you use a subset of C programming language to control your hardware. You have to manage your own switch debounce, interrupts, logic-level shifting and power for driving delays. If you have any time-based scheduling function involved, you may also need to add an RTC. Also you are responsible for adding your own interface (buttons, displays etc.) How much time and cost do you think will be needed to add the above to a base-arduino? Will you have complete confidence in the functioning of the hardware once you are done with the project? Will you need to create a 3-D printed enclosure to neatly package your project? Again – calculate how much it will cost.
As a final point of the blog post, let’s talk about the software. On Arduino or Raspberry Pi, you can pretty much write code any way you like. Five years from now, will you remember what your code is doing? Will someone else be able to access your code (without access to you) and figure out the functionality?
For one of my first PLC projects, I created the program below using Functional Block Diagram (FBD). The more commonly accepted programming paradigm is Ladder Logic which I didn’t use for no particular reason. By showing you this program, I just want to give an idea how “high level” programming on a PLC is. Truly, you just have to worry about the logic. The low level details are taken care of by the CPU and related hardware.
This program is complete software for the control of my pool pump motor. It should be easy to understand to anyone with Industrial Automation background. Even if you don’t, it essentially boils down to basic digital logic. It is not hard to figure out what each block does by reading its documentation.
Above program implements the following functions:
Manual START / STOP buttons
Network START / STOP functions
Network SET / READ schedule
Local Display to SET schedule
Local Display to show current status and configuration
As you see you can implement a robust solution with just a little extra cost upfront. It actually may turn out cheaper to use a PLC if you look for deals. For example, I bought mine for $66 on AliExpress.
If you think about it, there are a lot of appliances and devices around the house whose controlling circuitry are essentially single-purpose “PLC” under the hood:
Thermostat
Sprinkler System Controller
Pool Pump Controller
Oven / Cooking Stove / Microwave
Dishwasher / Clothes Washer / Dryer
Coffee Machine
Garage Door Opener
What if all of the above were built using a general purpose PLC that you could connect to over the Ethernet and add remote control and diagnostics capabilities. That would be a home-automators dream!
Other examples of PLC use
Traffic Lights
Elevators / Lift
Theme park rides
Automatic car wash
When you are out and about, look for control panel enclosures with emergency stop buttons. You will
see how widespread PLC-based automation is.
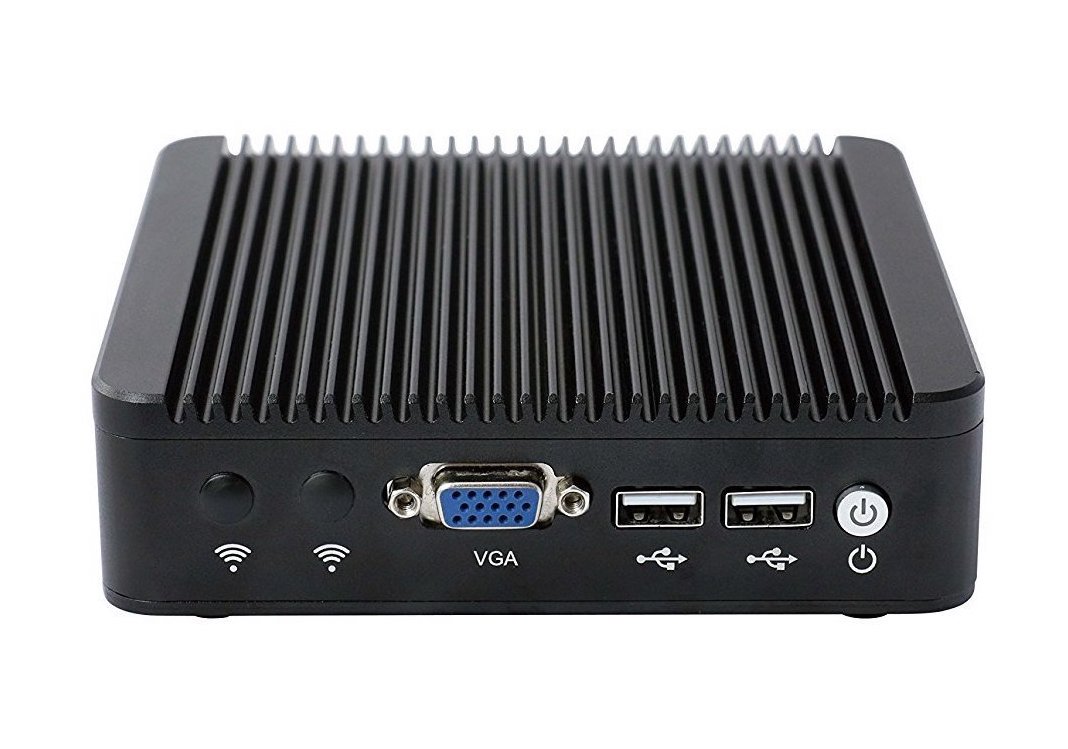
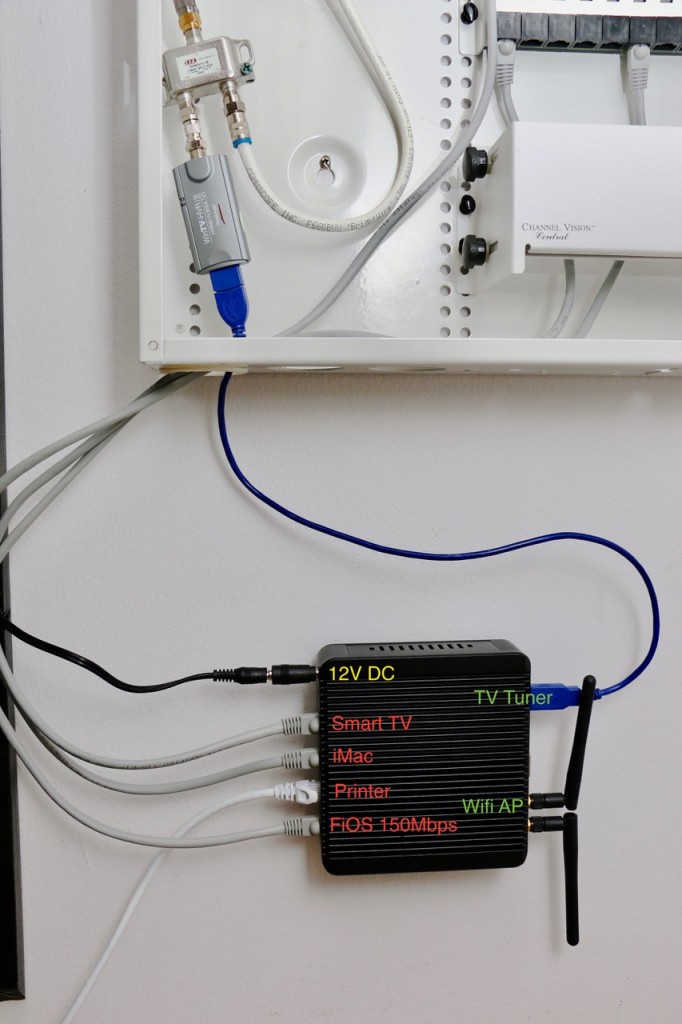
]]>Sumit BirlaEvolution of the Home Server2016-11-21T11:12:32-05:002016-11-21T11:12:32-05:00https://sumitbirla.me/2016/11/evolution-of-the-home-serverEver since broadband became available (around 1998), I have always run a general purpose Linux home server. I have used it as a router, a file server and to experiment with programming various things. The earliest servers were full-fledged tower computers, then I moved over to ITX form-factor and finally to an Intel NUC. While the Intel NUC is a very nice, compact and low power device, it only has one ethernet port. So I needed an additional network switch to connect my desktop, TV and printer. As many know, I am allergic to clutter comprising of cable, power supplies, and devices in general. Ideally, a single low power device should be able to do it all.
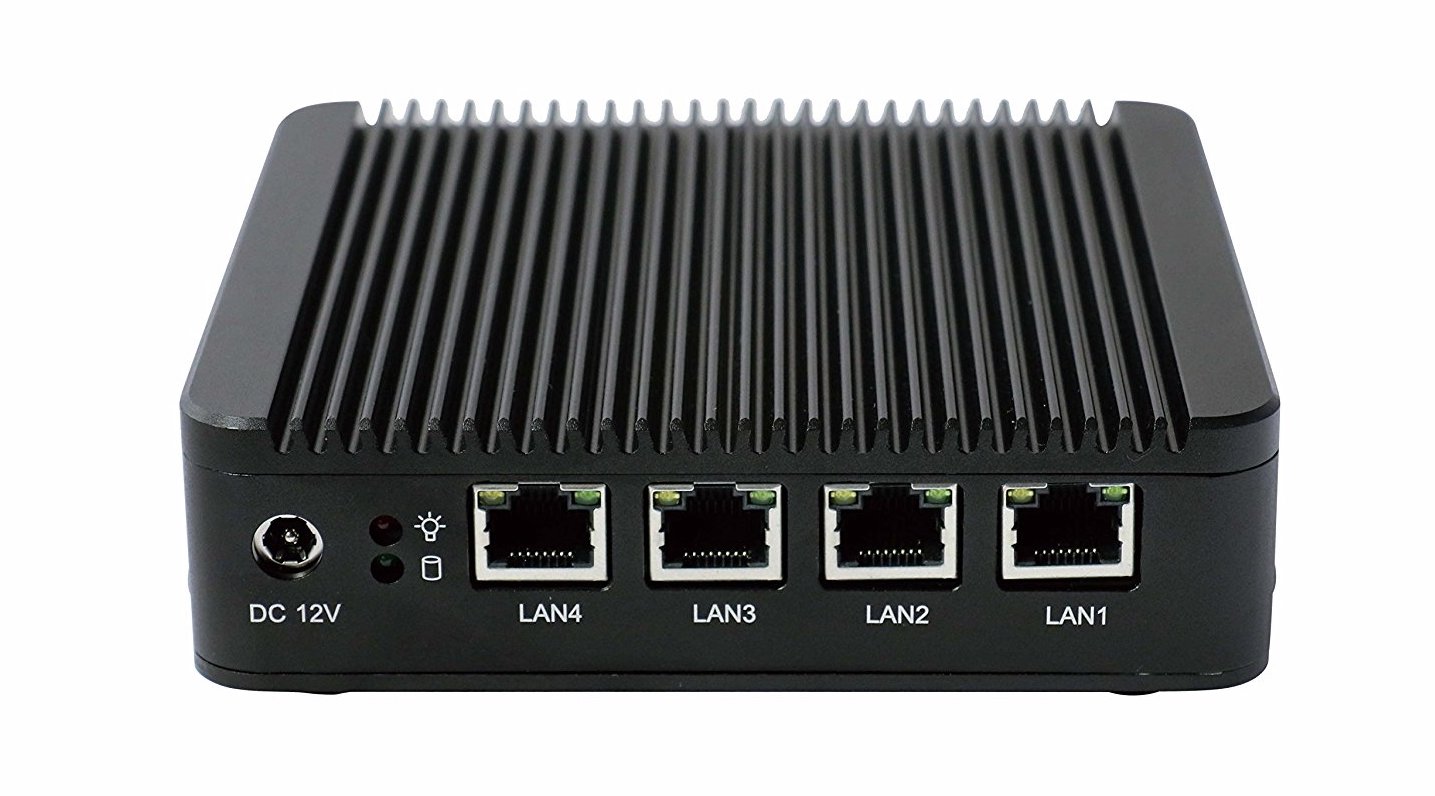
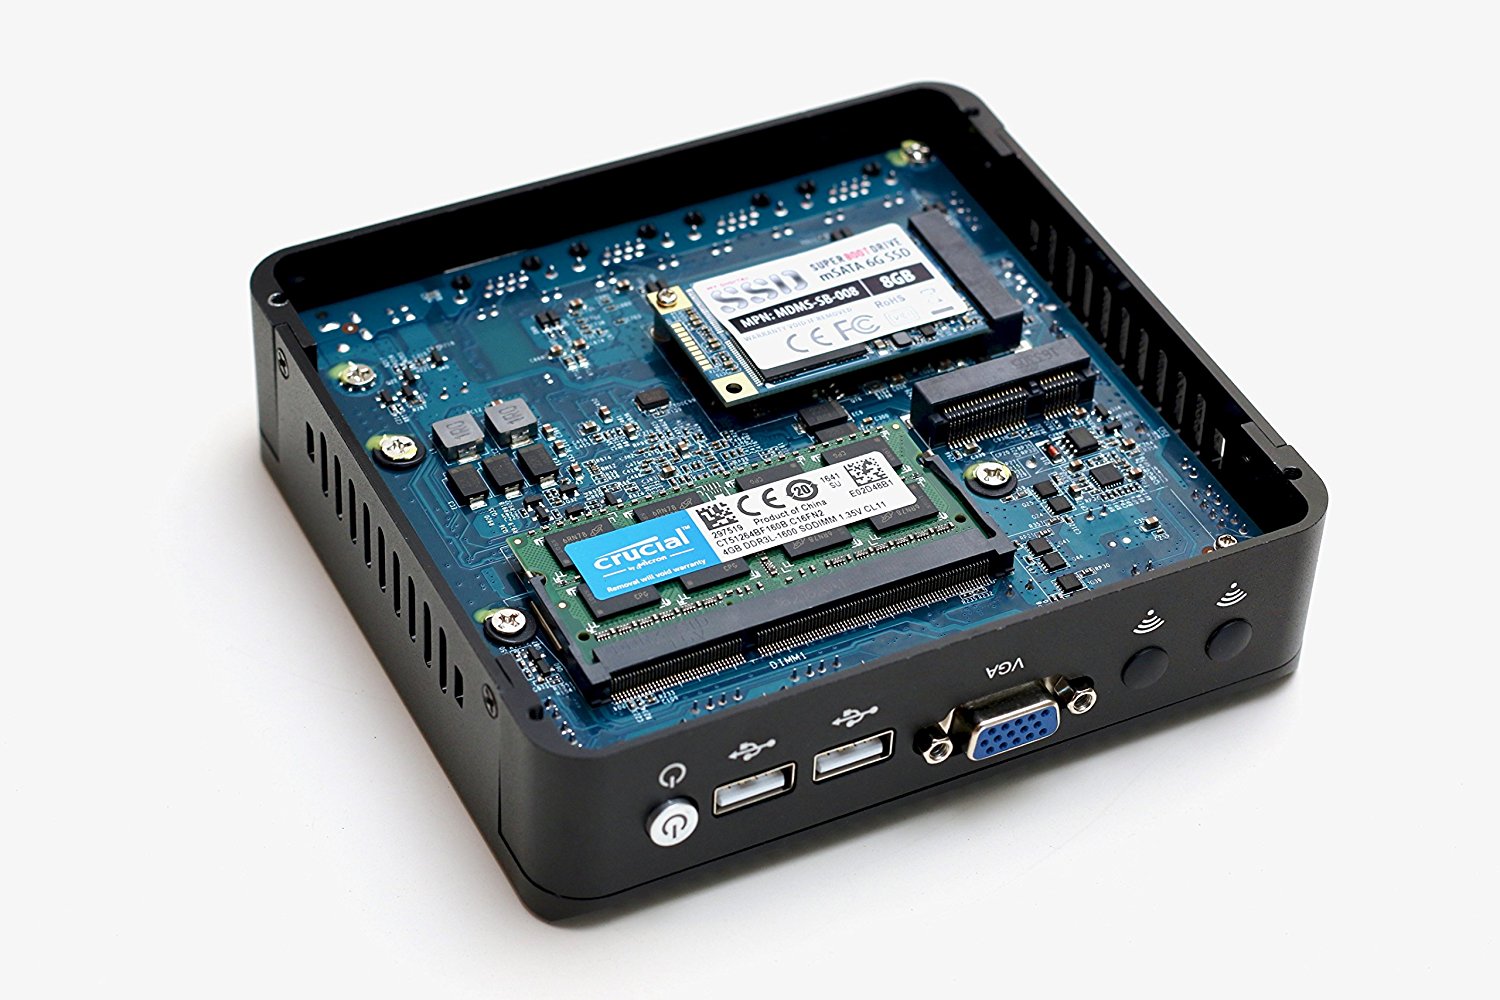
After a couple of years of running the Intel NUC, I finally found my close-to-ideal computer to act as the following:
Network Switch
Router
Wireless Access Point
Network Attached Storage (NAS)
Plex Media Server
TV Tuner Streaming
The little IBOX-N10a has 4 gigabit ethernet ports, two mSATA slots which I can use for SSD and wifi card. The device runs Intel Celeron J1900, Quad Core CPU at 2.00 GHz (turbo 2.4 GHz) and it is fanless with the chassis acting as a big heatsink. I have installed 4GB of RAM and a 1TB SSD from Samsung.
Crucial 4GB Single DDR3L 1600 MT/s (PC3-12800) SODIMM 204-pin
Samsung 850 EVO – 1TB – mSATA Internal SSD
IMC Networks 802.11 n/g/b Wireless LAN USB Mini-Card
APC Back-UPS Connect BGE90M – 3 hours backup power
The output of `lspci` is shown below. It is fairly simply system with the Celeron J1900 processor providing 4 lanes of PCIe, each connected to a single Intel 82583V Gigabit Network chip. The integrated SATA II controller connects to the mSATA slot while the WIFI card uses the USB signal lines on the second mSATA slot.
root@ibox:~# lspci -vt
-[0000:00]-+-00.0  Intel Corporation Atom Processor Z36xxx/Z37xxx Series SoC Transaction Register
+-02.0  Intel Corporation Atom Processor Z36xxx/Z37xxx Series Graphics & Display
+-13.0  Intel Corporation Atom Processor E3800 Series SATA AHCI Controller
+-1a.0  Intel Corporation Atom Processor Z36xxx/Z37xxx Series Trusted Execution Engine
+-1b.0  Intel Corporation Atom Processor Z36xxx/Z37xxx Series High Definition Audio Controller
+-1c.0-[01]----00.0  Intel Corporation 82583V Gigabit Network Connection
+-1c.1-[02]----00.0  Intel Corporation 82583V Gigabit Network Connection
+-1c.2-[03]----00.0  Intel Corporation 82583V Gigabit Network Connection
+-1c.3-[04]----00.0  Intel Corporation 82583V Gigabit Network Connection
+-1d.0  Intel Corporation Atom Processor Z36xxx/Z37xxx Series USB EHCI
+-1f.0  Intel Corporation Atom Processor Z36xxx/Z37xxx Series Power Control Unit
\-1f.3  Intel Corporation Atom Processor E3800 Series SMBus Controller
The power consumption when idle is around 8W. When playing a HEVC x265 video via Plex requiring transcoding, the power usage jumps to 15W. The chassis still doesn’t get too hot. The rest of the applications (dnsmasq, samba, tvheadend) barely use any CPU.
I am currently running Ubuntu 16.04 LTS Server on this box as the base operating system. dnsmasq acts as DHCP server and caching DNS. hostapd provides the wireless access point functionality. Samba turns the system into a file server while Plex and tvheadend handle the media functions. Plex is able to stream my videos directly to Samsung Smart TV which has a Plex client built in. tvheadend takes the input from the USB TV tuner and makes broadcast channels available over the network much like the hdhomerun devices. With all this software running, the system only uses around 300MB of RAM (out of 4GB). So I am confident that this system to serve me well in the foreseeable future.
Product and installation images
]]>Sumit BirlaOpenSIPS #3: Basic Accounting2016-03-20T22:27:07-04:002016-03-20T22:27:07-04:00https://sumitbirla.me/2016/03/opensips-basic-accountingWith any phone system, you want to log the calls and certain details related to each call. You may do this to perform billing or generate reports of some kind. By default, OpenSIPS performs very basic logging of events. So for a given call, you may have numerous rows in database and you are supposed to match an INVITE with corresponding BYE (or cancel) event and determine the bill_duration. This is quite a bit of work as you can imagine a lot of things can go wrong between the INVITE and the BYE.
There is another way to log successful calls by using the dialog module of OpenSIPS in conjunction with the standard acc (for accounting) module. Essentially, you create a database table that has columns that OpenSIPS expects by default. In addition you create columns for any additional information you would like to store per call. In my example below, I have chosen to store the src_user, src_domain, dst_user and dst_domain. You are free to store anything else if you prefer. You tell acc what to store in the “db_extra” parameter.
Once the module and database are configure, it is just a matter of setting the appropriate flag on INVITE and OpenSIPS will take care of the rest for you.
As always, the following script is for illustration purposes only. It has very few checks and may not work in your network setup. Pay attention to the use of DB_FLAG.
####### Global Parameters #########
debug=3log_stderror=nolog_facility=LOG_LOCAL0fork=yeschildren=2auto_aliases=nomhomed=1listen=udp:192.168.32.8:5060#LANInterfacelisten=udp:6.7.8.9:5060#WANInterface####### Modules Section ########
mpath="/usr/lib/opensips/modules/"loadmodule"signaling.so"loadmodule"sl.so"loadmodule"registrar.so"loadmodule"proto_udp.so"loadmodule"tm.so"loadmodule"uri.so"loadmodule"rr.so"loadmodule"mi_fifo.so"modparam("mi_fifo","fifo_name","/tmp/opensips_fifo")loadmodule"acc.so"loadmodule"dialog.so"modparam("acc","db_flag","DB_FLAG")modparam("acc","cdr_flag","DB_FLAG")modparam("acc","db_extra","src_user=$fU;src_domain=$fd;dst_user=$tU;dst_domain=$rd")modparam("acc","db_url","mysql://opensips:opensipsrw@127.0.0.1/opensips_new")####### Routing Logic ########
route{# process sequential requests
if(has_totag()){if(!loose_route()&&!t_check_trans()){sl_send_reply("404","Not here");exit;}t_relay();exit;}if(method=="INVITE"){# accounting
create_dialog("B");setflag(DB_FLAG);}record_route();# relay request in stateful manner to R-URI
if(!t_relay())sl_reply_error();}
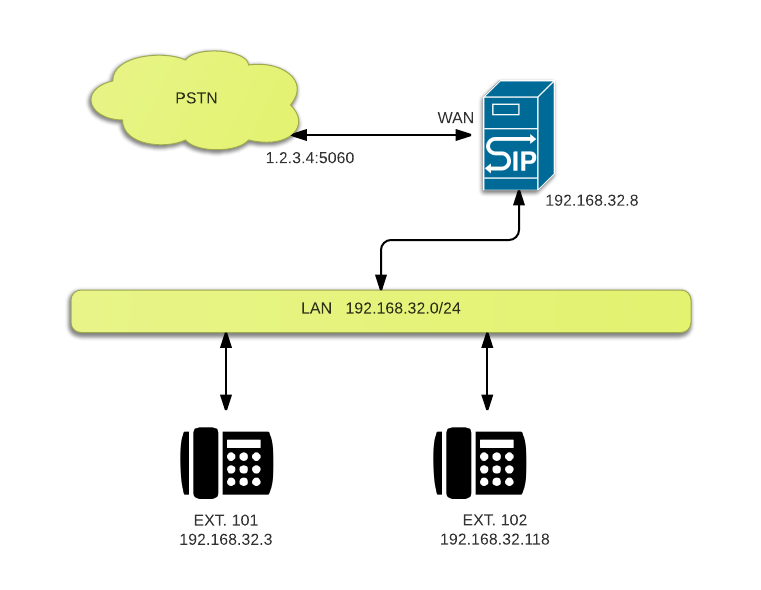
]]>Sumit BirlaOpenSIPS #2: Connecting to PSTN2015-11-25T00:40:28-05:002015-11-25T00:40:28-05:00https://sumitbirla.me/2015/11/opensips-connecting-to-pstn
Note: updated for OpenSIPS 2.2 (long term support) on May 10th, 2017.
Building on top of the simple example of previous article, we add connectivity to a PSTN gateway. This allows you to make outbound calls from your SIP phone. Since we will be running OpenSIPS on the WAN interface, please keep in mind the security ramifications of doing do, especially since we have no authentication mechanism in place.
Forwarding INVITE’s to the PSTN gateway is actually straight forward. We look the the request user field ($rU) to see if it is a local extension (3 digits). If so, we connect the call as always. If not, we rewrite the IP address ($rd) to that of the gateway and relay the packet.
To our script, we also add a few lines of code to handle sequential requests. This allows us to use loose routing to relay the packets without having to determine the routing logic all over again. Also note the `mhomed=1` and the listen lines at the top of the script. We are not binding to local and WAN interfaces on the server running OpenSIPS.
####### Global Parameters #########
log_stderror=nolog_facility=LOG_LOCAL0log_level=3children=2auto_aliases=nomhomed=1listen=udp:192.168.32.8:5060#LANInterfacelisten=udp:6.7.8.9:5060#WANInterface####### Modules Section ########
mpath="/usr/lib/opensips/modules/"loadmodule"signaling.so"loadmodule"sl.so"loadmodule"registrar.so"loadmodule"proto_udp.so"loadmodule"tm.so"loadmodule"uri.so"loadmodule"rr.so"loadmodule"mi_fifo.so"modparam("mi_fifo","fifo_name","/tmp/opensips_fifo")loadmodule"usrloc.so"modparam("usrloc","db_mode",0)####### Routing Logic ########
route{# process sequential requests
if(has_totag()){if(!loose_route()&&!t_check_trans()){sl_send_reply("404","Not here");exit;}t_relay();exit;}# register user location without authentication
if(method=="REGISTER"){xlog("registering $tU \n");save("nuc");exit;}# lookup requested user. if registered, below will replace R-URI with
# registered user's contact. Otherwise forward to PSTN gateway
if(method=="INVITE"){xlog("calling $tU \n");if($rU=~"^1[0-9][0-9]$"){if(!lookup("nuc")){sl_send_reply("404","User not found");exit;}}else{$rd="1.2.3.4:5060";#sendtogateway}}# make sure this node stays in the communication path
record_route();# relay request in stateful manner to R-URI
if(!t_relay())sl_reply_error();}
When you run the above script, you should be able to make outbound PSTN calls (provided your gateway allows it). You may not have 2-way audio because the gateway has no way of reaching your phone which has a private IP address (read how RTP streams work with SIP). This is a major source of headache in VoIP applications and will be addressed in the next article.
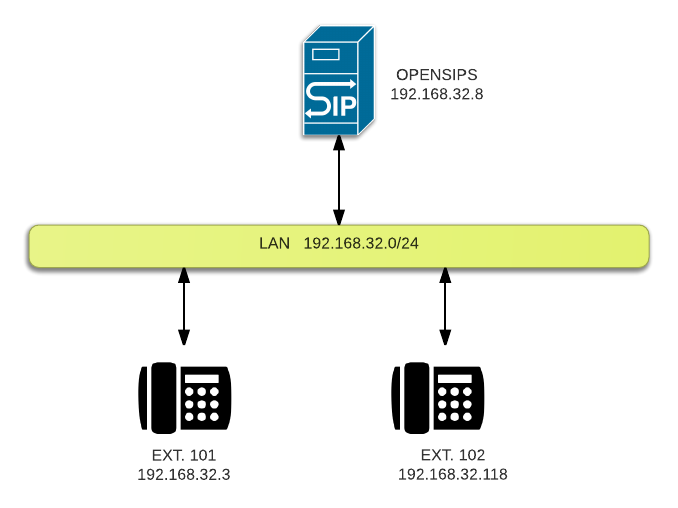
]]>Sumit BirlaOpenSIPS #1: A Basic Script2015-11-20T08:00:19-05:002015-11-20T08:00:19-05:00https://sumitbirla.me/2015/11/a-basic-opensips-script
Note: updated for OpenSIPS 2.2 (long term support) on May 10th, 2017.
Looking at a full-fledged OpenSIPS script for the first time can be a bewildering experience. It takes a lot of reading, testing and learning to get comfortable with it. However, for some instant gratification, you can try this. The script below is allows you to register SIP phones on your LAN and make calls to each other. It does not handle PSTN calls or any other fancy features. It doesn’t even check for your credentials, so you can pass in anything you like. If two phones are set up with the same extension, both will ring.
log_stderror=nolog_facility=LOG_LOCAL0log_level=3children=2auto_aliases=nolisten=udp:10.0.9.1:5060#CHANGEMYIPADDRESS!####### Modules Section ########
mpath="/usr/lib/opensips/modules/"loadmodule"signaling.so"loadmodule"sl.so"loadmodule"registrar.so"loadmodule"proto_udp.so"loadmodule"tm.so"loadmodule"mi_fifo.so"modparam("mi_fifo","fifo_name","/tmp/opensips_fifo")loadmodule"usrloc.so"modparam("usrloc","db_mode",0)####### Routing Logic ########
route{# register user location without authentication
if(method=="REGISTER"){xlog("registering $tU \n");save("nuc");exit;}# lookup requested user, if registered, below will replace
# R-URI with registered user's contact
if(method=="INVITE"){xlog("calling $tU \n");if(!lookup("nuc")){sl_send_reply("404","User not found");exit;}}# relay request in stateful manner to R-URI
t_relay();}
Run the script and watch your syslog for register and calling messages. You can also view registered users with the following command:
In the next post, I will show how to add a PSTN gateway to this set up so that you can make outgoing calls. Small Steps. I recommend reading up on how SIP works and the structure of a SIP datagram and the various field before proceeding with more advanced topics.

 Now
comes the big revelation. Should I buy a pool ionizer for $500 - $600? NO! You can buy some very
pretty copper sulphate pentahydrate (CuSO4.5H2O) for around $5 for a small
quantity (4 oz). That’s all you really need. This chemical has been used since the 19th century for
disinfecting. I have used it in high school for electro-plating experiments. Thankfully no one told
me back then that I would get metal poisoning if I touched the chemical. But I turned out
Oblerpl..3,14;K 🤪. I think.
Now
comes the big revelation. Should I buy a pool ionizer for $500 - $600? NO! You can buy some very
pretty copper sulphate pentahydrate (CuSO4.5H2O) for around $5 for a small
quantity (4 oz). That’s all you really need. This chemical has been used since the 19th century for
disinfecting. I have used it in high school for electro-plating experiments. Thankfully no one told
me back then that I would get metal poisoning if I touched the chemical. But I turned out
Oblerpl..3,14;K 🤪. I think.